Creation of Carbon Copy
 If I start to tell the story about the creation of Carbon
Copy, our 12’ skiff, I have to start five years ago with the construction of a
wooden, stitch and glue, rowboat we called Honey Badger. I had purchased plans online, with dreams of
building a light little rowboat that my wife and I could use as a tender on s/v
Wheee Dogggie, a 1968 Cal 40.
If I start to tell the story about the creation of Carbon
Copy, our 12’ skiff, I have to start five years ago with the construction of a
wooden, stitch and glue, rowboat we called Honey Badger. I had purchased plans online, with dreams of
building a light little rowboat that my wife and I could use as a tender on s/v
Wheee Dogggie, a 1968 Cal 40.
I started construction in a storage building; cut out all
the parts needed and began assembly. The
boat went together very quickly and I learned through numerous mistakes. I used West System epoxy and zip ties as I brought all the joints together. This was my first attempt at stitch and glue
assembly and also my first attempt at building a boat. I was apprehensive about my end result.

After many weeks of work, we finished Honey Badger and she
was a fine looking skiff. We used her
quite a bit in the first few months but she had a bit too much junk in her
trunk. Pulling her out of the water was
a major undertaking. Trying to get her on the fore deck was a nightmare.
We later moved to a house on the water and the inability to
launch her from the bulkhead in the back yard prolonged her neglect.
She sat next to the house for another year and a half.
Direct orders from the Admiralty (my wife) required me to
either fix Honey Badger and get her in the water or get a new skiff to replace it. I chose building a new one by using the lessons learned from
my past mistakes.
Lessons learned five years later:

·
Pre-drill
and epoxy fasteners - I did not pre-drill and epoxy fill many of the screw
holes needed for attached devices, i.e. oar locks, cleats and pad eyes. This
was a huge fail. We found that water
intrusion started to rot the wood core.
·
Fiberglass
– We should have fiber glassed the entire bottom and transom to protect it
from abrasions. I used multiple coats of
epoxy on all surfaces but that will not protect it from scratches. When the epoxy gets scratched, water gets in.
·
Drain
Plug - I neglected to put in a drain plug.
This could have been easily corrected but due to the lack of use, this
never happened.
The list of changes I would incorporate into my new
adventure was primarily reducing the weight and eliminating wood as much as
possible. My thought was to use the
existing hull as a pattern and make the boat completely out of fiberglass. I figured I would have to use wood in some
areas that needed more strength, but this might just come from my fear or
ignorance in the use of fiberglass. Now
came an entirely new learning curve, I began to study the technique of hand
layup of fiberglass.
For this new project, I wanted to use Polyester resin and
not my typical West System Epoxy. I
wanted to try my hand at it and learn, before starting another project sitting
in my front driveway, a 1964 Pearson Ensign restoration. Being that the Ensign was originally made
with Polyester resin, I wanted to make all my repairs with the same. We will chat about this in a future blog
post.
 I ordered my materials from US Composites and started work in
February 2016. With the help of a neighbor,
I ordered my materials from US Composites and started work in
February 2016. With the help of a neighbor, I flipped Honey badger over, onto the roller cart I had built, and started to prep the bottom of the boat. I tried my best at making the hull smooth, smooth definitely being a relative term. My greatest fear was laying up the new fiberglass shell and not being able to separate it from the old hull. I had put a lot of thought into this and came up with numerous ideas that would increase the chances of separating the fiberglass from the old boat. I went with mold release wax and then at the last minute added wax paper.
 Many that have perfected the art of fiberglass may
scoff at my sophomoric attempt, this is not the way the professionals would
make a boat. The pros would have made a
mold with gel coat and many layers of mat.
They would have polished it to a mirror gloss and then laid up the new
hull from that mold created. I was not
that pro and did not want to make multiple boats, I just wanted one boat that
floated and did not rot. My intention
was to lay up a new boat from the “male” plug called Honey Badger.
Many that have perfected the art of fiberglass may
scoff at my sophomoric attempt, this is not the way the professionals would
make a boat. The pros would have made a
mold with gel coat and many layers of mat.
They would have polished it to a mirror gloss and then laid up the new
hull from that mold created. I was not
that pro and did not want to make multiple boats, I just wanted one boat that
floated and did not rot. My intention
was to lay up a new boat from the “male” plug called Honey Badger.
I started laying up the fiberglass on the bottom, first with
a light 2 oz. cloth and then with stranded mat.
I later learned that the first layer of cloth was for the most part,
worthless. My initial thought was that
the light cloth would make a better finish on the inside of the boat. The remainder of the boat was laid up with
just mat that I tore into small sections and scattered across the hull of the
boat and thoroughly wetted out with resin.

Due to the size of the hull, I could not lay up the entire
hull all at once. This made it necessary
to sand in between laid up sections and layers.
Just a little added work but it gave me a beer break and the chance to
reflect. The one benefit was that I
could separate the bottom of the fiberglass hull from the mold before moving on
to the topsides. I appreciated this as the hull came together; I found it
harder and harder to separate the new shell from the old hull. By this point, I also learned that the wax
paper was more of a hindrance than help, it would stick to the new fiberglass shell and
had to be sanded off before the inside of the boat could be finished out. The wax paper also created ripples and waves in the shell that would not have been there if I laid the fiberglass directly on the mold. I
stopped using wax paper and just used mold release wax when I got to the topsides, this worked
with much better results. I separated
each section from the old hull as each spot cured.
Finally after a couple days of laying up, sanding and then laying up the next section, I had a shell of a boat.
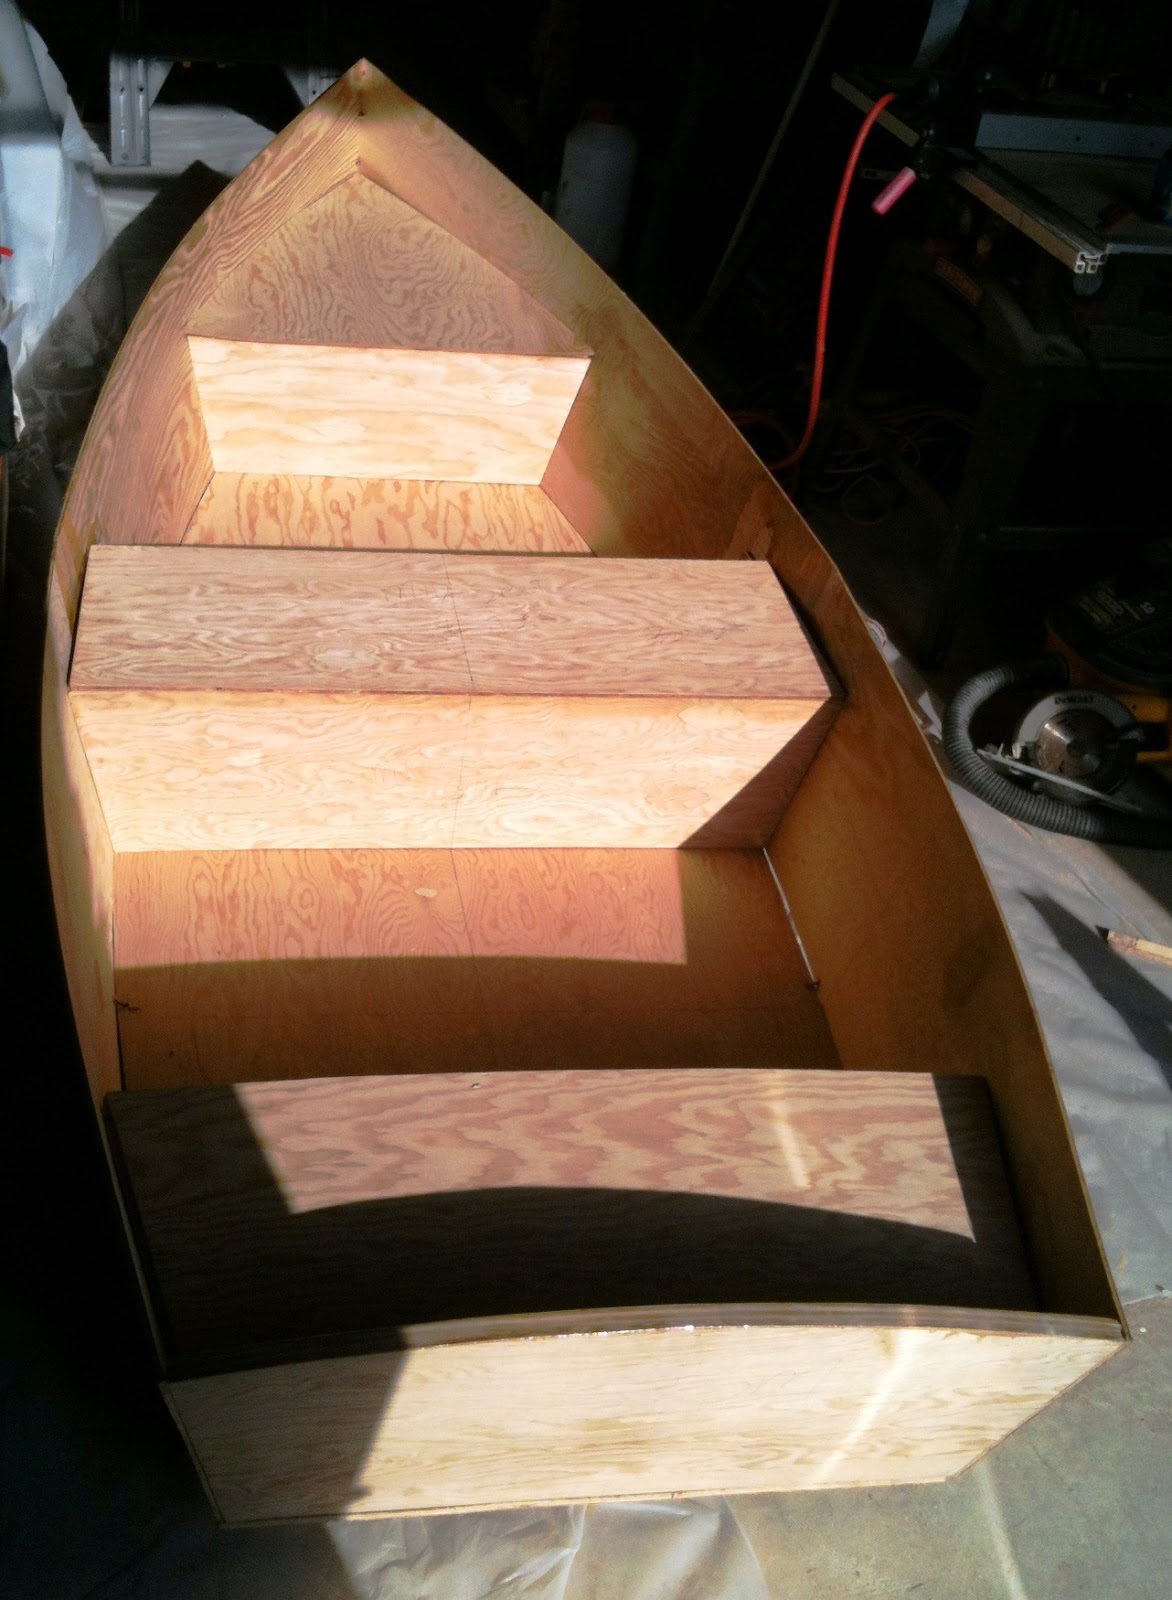
 Once the shell was done, I flipped Honey badger over and laid up the seats in the same fashion as the hull. One by one they were completed and popped out of the original boat. I did use the wax paper again when trying to deal with the non-skid that existed on the seat tops. This did not present the same problem as the hull because I did not intend to do anything with the underside of the seats, that was just going to be filled with two-part Polyurethane foam once the seats were glassed in.
When I put the seats into the shell of the new boat, they fit like a glove. No trimming was needed with the exception of a few fibers and polyurethane drips. I have much to do under the seats before they can get glassed in permanently. I will need to add drainage, stringers and increase the strength of the topside glass. To pour in the two part foam, I will cut some holes and pour it in gradually, numerous batches so that I do not stress the structure. Once it is foamed, I can then put the last layer of glass on the top of the seats.

I later glassed in one of the few pieces of wood that will be used in this project, the transom. I cut out the plywood, gave it a good coat of polyester resin and then fastened it with thickened resin. Once it cured, I started to glass over it and strengthen the transom to topside joints. I will add more structure in the next step of the construction.
 I travel for work and it gives me three weeks to think about the next few steps in this project.
I changed my thoughts on exterior finish and decided to go with carbon fiber rather than paint. I will cover the entire exterior hull with carbon fiber cloth and a clear UV polyester gel coat. It may just be cosmetic but I also feel it will give some abrasion resistance.
If I could do it all over again (and I likely will on an 18-20' sailboat) I would do the entire boat in carbon fiber. The thought scared me a bit in the past, but now after some reading, I think I could handle it.
More in the next episode...


